How thank-you pages and intermediate confirmation pages work
🎯 General principle
Blastform lets you personalize the end-of-form experience with thank-you pages or intermediate confirmation pages.
These pages also play a key role in triggering conversion pixels, depending on your tracking and lead filtering needs.
🟩 A) Thank-you pages
🔸 a) Thank-you page – Pixel disabled
This configuration displays the thank-you page directly at the end of the form, with no intermediate step.
No pixel will be triggered on this page.
💡 Recommended use:
If certain types of leads are irrelevant to you (off-target or invalid), you can display this page to them without triggering any conversions.
📄 Behavior summary:
Form completed → Thank-you page (selected text) → ❌ No pixel triggered
🔸 b) Thank you page – Pixel enabled
This configuration also displays the thank-you page directly, but pixels there are triggered according to your conditional logic.
💡 Recommended use:
For qualified leads or standard conversion scenarios.
📄 Behavior summary:
Form completed → Thank-you page (selected text) → ✅ Pixels enabled
🟦 B) Intermediate confirmation pages
Intermediate pages are displayed before the thank-you page, to validate a phone number (manually or via SMS code).
They help ensure lead quality and control pixel triggering.
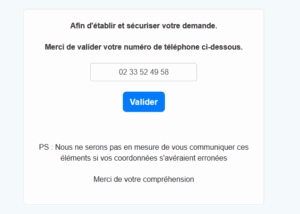
🔹 a) Manual phone confirmation page – Pixel disabled
This page displays an intermediate step where the user must manually validate the phone number entered in the form.
They can modify it if necessary.
No pixel is triggered on this page.
Once the number has been validated, the user is redirected on the thank-you page with pixels enabled.
💡 Recommended use:
For forms where users often enter a landline phone number.
📊 Functioning diagram:
Form validation → Manual phone validation page → Thank-you page (pixels enabled ✅)
🖼️ Visual example (screenshot of manual validation interface)
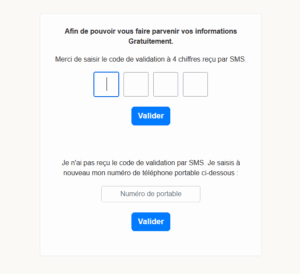
🔹 b) SMS code confirmation page – Pixel enabled
This page displays an intermediate step where the user is asked to enter a 4-digit code received by SMS.
Pixels are triggered on this pagebased on your conditional logic.
Once the code is validated, the user is redirected to the thank-you page where pixels are deactivated.
💡 Recommended use:
For forms where the users enter a mobile number.
📊 Operating diagram:
Form validation → Mobile validation page (4-digit code, pixels enabled ✅) → Thank-you page (pixels disabled ❌)
🖼️ Visual example (screenshot of SMS code validation interface)
🔹 c) SMS code confirmation page – Pixel disabled
Same principle as above, but pixels are not triggered on the validation page.
They are only activated only one the final thank-you page , after the SMS code has been validated.
💡 Recommended use:
For scenarios where you only want to measure complete conversions (after code has been validated).
📊 Functioning diagram:
Form validation → Mobile validation page (4-digit code, no pixel ❌) → Thank-you page (pixels enabled ✅)
🖼️ Visual example (screenshot of SMS code validation interface)
🧭 Quick checklist
✅ You've chosen the correct page type (thank-you or confirmation).
✅ You know when your pixels are triggered.
✅ You test the full scenario before going live.
✅ You use conditional logic to target the right leads.


