Thank-you page selection and conditional logic
🎯 General principle
Blastform lets you customize the end-of-form experience based on your users' responses.
With conditional logic, you can choose which thank-you page or intermediate page to display, and decide whether or not your conversion pixels should trigger or not.
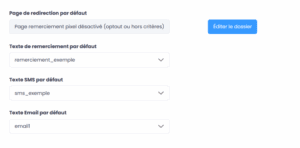
🟩 A) Top section – Configuring the "Thank You Page"
🔸 1) Default page: "Thank-you page pixel disabled".
By default, the page selected is "Thank-you page pixel disabled".
This means that if no conditional logic is set up, this page will be displayed automatically at the end of the form.
👉 No pixel will be triggered on this page.
💡 Recommended use:
If certain leads are irrelevant to you (off-target or invalid), this page is ideal for excluding them from tracking.
📄 Behavior:
No logic active → Page "Thank-you page pixel disabled" → ❌ No pixel triggered
🔸 2) Choice of default thank-you text
You can select the thank-you text to display for all leads, regardless of their response.
This message will appear on the thank-you page if no specific logic is applied.
🔸 3) Choice of SMS content / Confirmation email
You can also customize the content of the SMS and/or email the lead receives after submission.
This lets you tailor the message to your overall scenario (registration confirmation, reminder, additional information, etc.).
🖼️ Example screenshot: "Thank You Page" interface with text, SMS, and email options
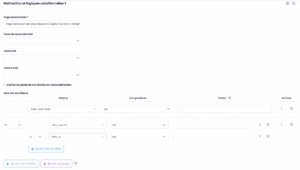
🟦 B) "Redirection and conditional logic" section
This section allows you to create dynamic redirection rules based on visitor responses.
Logic rules are processed in display order: logic 1 will be executed before logic 2, and so on.
🔹 1) Select the page to display
In each logic, you can choose which thank-you page or intermediate page to display when the conditions are met.
(e.g. display a phone validation page for mobile leads).
🔹 2) Choice of associated thank-you text
You can also set a specific thank-you text to display for this logic, different from the default text.
💡 Example: show a personalized message for qualified leads, or an informational message for off-target leads.
🔹 3) Personalization of the SMS / email sent
Each logic can trigger different SMS and email content, depending on the defined conditions.
This makes it possible to send messages that are more relevant and tailored to the lead's profile.
🔹 4) Activation or deactivation of pixels
You can check the box "Enable conversion pixels on this redirection"
-
✅ If the box is checked, pixels will be triggered on the selected page.
-
❌ If unchecked, no pixel will be sent for this logic.
💡 This helps prevent multiple or unwanted conversions.
🔹 5) Definition of trigger conditions
This is where you define the rules that trigger each logic.
You can combine multiple conditions depending on the form fields.
📘 Example:
-
Trigger the logic if phone number starts with 06 or 07 (mobile)
-
AND if the person answered that they like sports
➡️ In this case, the user will be redirected to the page confirmation of telephone by SMS, with pixels enabled.
🖼️ Example screenshot: conditional logic interface with multiple conditions and associated redirection
🚀 Final stage – Publication
Don't forget to click the "Publish" button at the top right of the page to save and apply your changes.
No changes will be applied without this action.
🧭 Quick checklist
✅ Default thank-you page configured
✅ Conditional logic set up in the right order
✅ Conditions clear and consistent
✅ Pixels enabled or disabled as needed
✅ Form republished after making changes


